시스템 BIOS에서 UEFI가 활성화 된 상태에서 저장 디스크에 Windows® 10을 올바르게 설치하고 GPT (GUID 파티션 테이블)가 생성되었습니다.
요약
GPT(GUID 파티션 테이블)를 사용하여 UEFI를 사용하도록 설정하는 Windows® 10 설치를 수행하는 것이 좋습니다.
MBR(마스터 부트 레코드) 스타일 파티션 테이블을 사용하는 경우 일부 기능을 사용하지 못할 수 있습니다.
GPT(GUID 파티션 테이블) 파티션에 OS를 설치하도록 시스템 구성
| 메모 |
|
- USB Windows® 10 UEFI 설치 키 연결
- 시스템을 BIOS로 부팅합니다(예: "F2" 또는 "Delete" 키 사용).
- "부팅 옵션 메뉴"를 찾습니다.
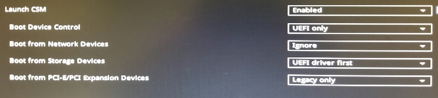
- Launch CSM을 "Enabled" 로 설정합니다.CSM이 "사용 안 함"으로 설정된 경우 아래 8단계로 건너뛸 수 있습니다
- 부팅 장치 제어를 "UEFI 전용"으로 설정
- 먼저 저장 장치에서 UEFI 드라이버로 부팅을 설정합니다.
- 변경 사항을 저장하고 시스템을 다시 시작합니다.
- BIOS를 다시 입력합니다 (예: "F2" 또는 "Delete" 키 사용).
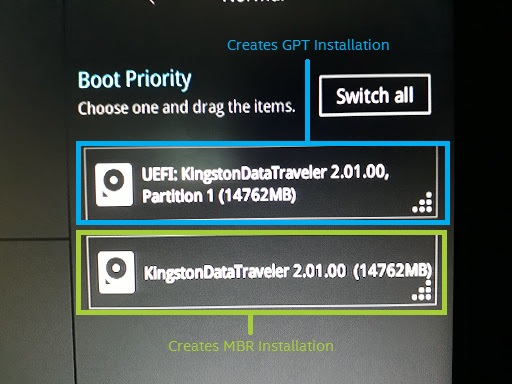
- 부팅 우선 순위 목록에서 "USB UEFI OS Boot" 옵션이 목록 맨 위에 있는지 확인합니다.
- 평소와 같이 시스템을 재부팅하고 Windows*를 설치합니다.
Windows*가 GPT 파티션에 설치되어 있는지 확인합니다.
- Windows*로 부팅
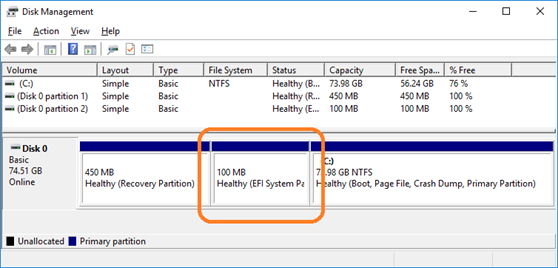
- 디스크 관리자를 엽니다 (Windows® 10의 경우 "Windows*" 키와 "X" 키를 동시에 누른 다음 "디스크 관리자" 클릭). EFI 시스템 파티션을 포함하여 세 개의 파티션이 표시됩니다.
3. 왼쪽에 (Disk x, Basic, Capacity, Online)으로 표시된 디스크를 마우스 오른쪽 버튼으로 클릭합니다.
4. "속성" 을 선택합니다.
5. "볼륨" 탭을 클릭합니다. 여기에서 다음을 확인할 수 있습니다."파티션 스타일".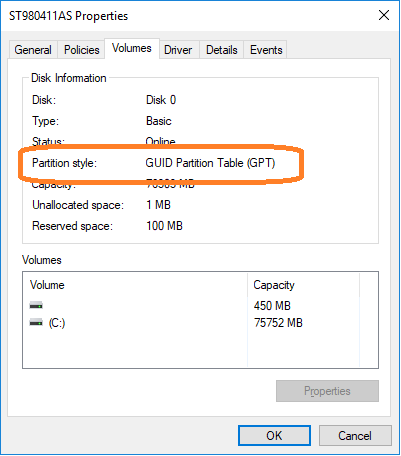
질문? 도움이 필요하면 커뮤니티 포럼을 확인하세요.
문제?
[중국어] [영어] [독일어] [일본어] [한국어]
성공